
Snowboarding becomes surprisingly inconvenient when the snow stops pointing downhill. The board has no pedals, and hopping with both feet attached is a poor transportation policy in a crowded base area. That’s where skating earns its place in the lesson.
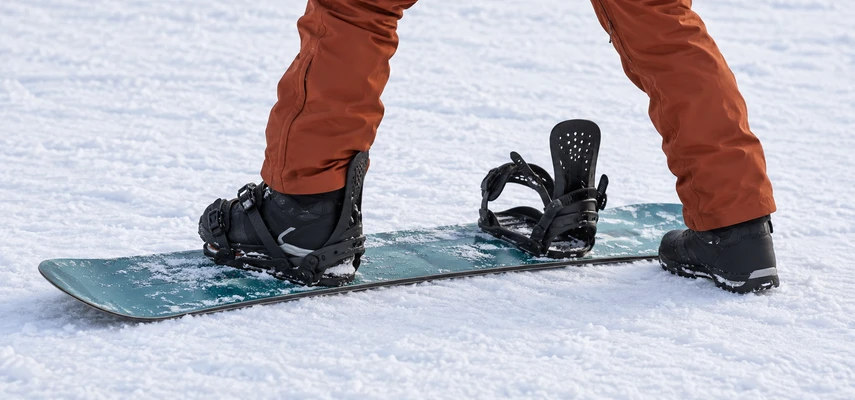
Skating means keeping the front foot attached while using the free rear foot to push along the snow. It looks like a small logistical skill. In practice, it connects the rental area, lift queue and short flat stretches to the riding you came to do.
Learn it on level snow in a clear space chosen by an instructor. You need room for short, slow attempts and a reliable way to stop. A busy lift queue or an unloading ramp is somewhere to use an established skill, not the place to discover whether you have it.
Know which foot stays attached
For your usual direction of travel, the lead foot remains secured in the front binding. In a regular stance that’s the left foot; in goofy it’s the right. The rear binding is released, leaving the rear foot free to push.
Have the instructor or rental technician explain the binding operation before moving. Keep straps where they won’t trip you or interfere with the free boot, following the equipment’s instructions. If you’re unsure whether a boot is properly secured, resolve that question while stationary.
The free foot and attached foot have different immediate jobs. One supplies a small push from the snow; the other helps manage the board beneath your body. They’re still part of one coordinated movement. Treating the attached leg as a rigid post makes the transition between pushing and gliding harder.
REI’s beginner progression introduces skating with the front foot attached and small steps. That emphasis matters. You’re learning to stay connected to the platform, not trying to cover the maximum distance with each push.
Arrange the board before asking it to move
Place the board in the intended direction across level packed snow, with clear space ahead. Stand in a comfortable position with a little mobility through the supporting leg. Look toward the route while remaining aware of nearby people.
Begin with the free boot beside the board. A common beginner progression places it on the heel-side, the side behind the heels. Some riders and instructors use other arrangements for particular situations; start with the version being taught rather than switching methods every few seconds.
Keep the free foot close enough that you don’t have to stretch to regain support. If the board slides away and the legs spread, stop the exercise and reset with help. A long reaching stance is a sign that the task has become less manageable, not that you’re almost doing a powerful skate.
Check that the surface really is suitable. A patch that appears flat can slope subtly, and hard or uneven snow changes traction. The instructor should help establish the practice space and stopping arrangement before the first push.
Build a short push you can repeat
With the attached foot guiding the board, use the free foot for a small push against the snow. Let the board move a short distance while your body travels with it. Keep the movement compact enough that bringing the free foot forward again feels easy.
The free foot shouldn’t trail so far behind that the legs separate into an uncontrolled split. Burton’s skating guidance emphasizes avoiding a push beyond a manageable relationship to the rear binding. The useful result is a repeatable movement, not a long stride.
Start with one push and a controlled finish. Then, as the instructor considers appropriate, connect a few small pushes. Notice whether the board stays on the intended route or turns away while you concentrate on the free leg.
If the nose swings, don’t assume you need more force. You may be changing pressure across the attached foot, twisting the upper body or letting the board tilt. A slower attempt gives the instructor a better chance to identify which relationship needs attention.
Move onto the board for a glide
Once short pushes feel manageable, the next task is placing the free boot on the board for a brief glide. A typical beginner placement is between the bindings, near the rear binding, with the boot braced as your instructor demonstrates. It’s resting on the board, not locked into the binding.
Clear snow from the intended contact area when appropriate and follow the equipment guidance. A stomp pad can improve traction in that area, but it doesn’t secure the foot the way a binding does. Don’t treat the presence of a pad as proof that the boot can’t move.
Place the foot deliberately rather than stamping down or reaching toward it with your whole torso. Look along the route and keep a small amount of movement available through the legs. A calm placement helps the body travel with the platform instead of chasing it.
The first glide should be short and slow, in the agreed practice area. Don’t add a slope simply because putting the foot down worked once. Gliding with one foot free introduces a new balance relationship and needs its own controlled practice.
Plan the stop before the push
Level ground and a suitable runout reduce the demands, but they aren’t a complete stopping plan. Ask the instructor to demonstrate the appropriate one-foot slowing and stopping method for the surface and task. Practice that before linking several pushes.
At very low speed on level snow, the free foot can be used in an instructor-taught way to add resistance. That doesn’t make dragging a foot a dependable brake on a descent. Snow conditions, balance and traction can change the result, and a free foot isn’t a replacement for learning two-foot edge control.
Avoid jumping off a moving board or making a large stepping motion to rescue a glide that’s become too fast. The attached foot remains connected while the rest of you tries to go somewhere else. Reduce the practice demand and get help before repeating an uncontrolled attempt.
Choose a clear destination that leaves room to finish. Pushing toward a queue and hoping to work out the final few feet afterward reverses the useful order of learning. The stop is part of the skill, not the administrative detail after it.
Keep the upper body from doing all the work
When the board feels difficult to guide, beginners may reach with the arms or turn their shoulders sharply. That can change the body’s relationship to the attached foot and make a simple push less predictable. It also leaves less attention for the people around you.
Try a smaller movement with the instructor’s feedback. Keep the torso comfortable and let the supporting leg remain responsive. A generally aligned starting position is useful, but it isn’t a command to hold every joint still.
The AASI performance guide distinguishes pressure along and across the board. In skating, that distinction helps explain how a foot can accidentally roll the board onto an edge while you think you’re only pushing it forward.
If balance disappears whenever the free boot leaves the snow, return to shorter pushes or stationary placement practice. One part of the task may need more familiarity. Repeating the entire sequence faster usually adds confusion rather than removing it.
Bring the skill to the lift area gradually
Once your instructor is satisfied with your control, practice moving toward a clear stopping point and joining a simple line without crowding others. Keep equipment and free-foot movements within your own space. Nearby skis and boards don’t always leave room for an expansive stride.
Follow the lift’s signs and attendant instructions. The NSAA Responsibility Code requires knowing how to use lifts and asking for help when needed. Skating is preparation for that task, not evidence that you already understand every loading and unloading procedure.
A conveyor, surface lift and chairlift may require different actions. Ask what happens at the specific lift and learn with qualified supervision. Confidence from level-ground skating should support that conversation rather than replace it.
Don’t stop in an unloading lane to fasten the rear binding. Clear the exit as instructed and use an appropriate visible area. The one-foot glide exists partly to give you a way to reach that space without interrupting the people behind you.
Make small observations useful
After an attempt, ask yourself what changed: did the board point away, did the free foot travel too far back, or did placing it on the deck disturb your balance? Share one specific observation with the instructor. It’s easier to adjust one relationship than to fix the general feeling of being awkward.
Watch fatigue and traction as practice continues. A foot that grips the snow comfortably in one spot may slide in another. If something hurts or you repeatedly lose control, stop and reassess rather than treating more repetitions as the only available answer.
Skating won’t be the most dramatic part of your snowboarding. It may become one of the most quietly useful. A few compact pushes, a deliberate foot placement and a controlled finish turn an inconvenient flat patch into a manageable part of the mountain day.