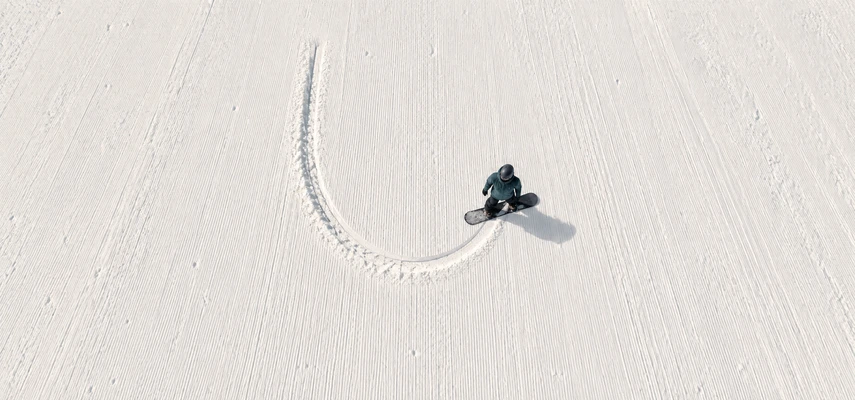

The first turn changes the question from where will this board take me to where can I guide it? That may involve only a short curve on a gentle learning slope. It can still feel like a major improvement in the transportation arrangement.
A beginner turn is a coordinated change of direction, usually with some sideways slipping. You don’t need a clean carved arc, a steep slope or a dramatic spray of snow. You need a manageable starting movement, a route you understand and a controlled finish.
Learn with an instructor on suitable terrain. You should already be developing equipment familiarity, basic balance and controlled sliding and stopping. A written explanation can make the progression understandable, but it can’t choose your slope or judge when you’re ready for the next task.
Establish what the turn is supposed to accomplish
Your first objective might be a short glide followed by a gradual curve across the slope toward a stop. Instructors often use J-shaped turns to connect forward movement with a deliberate change of direction. The letter describes the route, not a shape you must reproduce perfectly.
Ask where the attempt starts, where the curve develops and where it should finish. Agreeing on those points reduces uncertainty. It also gives the instructor something concrete to observe beyond whether you looked confident for a few seconds.
The REI beginner progression uses gliding, J-turns and traverses as steps toward connected turns. Your instructor may adapt the tasks or introduce them in another sequence. Different exercises can build the same underlying skills.
Keep the target small. A short successful change of direction tells you more than a long glide followed by a rushed rescue. Distance and speed aren’t rewards for having understood the first explanation.
Choose terrain that leaves time to learn
A useful learning area has a gentle, consistent pitch, appropriate snow and enough clear space for the intended route and finish. It should be selected with an instructor, not identified only by finding a green symbol on the map.
Ratings are relative within a resort, and a trail may contain changes in pitch or width. Snow can be scraped, soft or uneven. The same movement can produce a different response when those conditions change, so the setting belongs in the lesson plan.
Look uphill and check the route before starting. Leave room for other users rather than assuming a beginner exercise has priority across the entire slope. The NSAA Responsibility Code requires avoiding people ahead and remaining able to control your movement.
If the practice area becomes crowded or intimidating, ask to adjust the task. A smaller movement or different location can be more useful than adding courage to a situation that leaves too little space to think.
Begin with a body position that can change
Keep comfortable mobility through ankles, knees and hips, with a calm upper body and awareness of your direction. You need enough support over the board to influence it without bracing stiffly against the tail.
Avoid treating centered as a rule that pressure can never change. Useful movements redistribute pressure for the task. Equally, don’t interpret front-foot guidance as permission to lunge toward the nose. The instructor should explain the intended change and watch its effect.
Look along the route rather than studying the front binding. Vision helps you anticipate the space ahead, but looking alone doesn’t steer the board. The movements below the head still have to organize contact with snow.
If a boot feels loose or painful, or the stance makes comfortable movement difficult, get that checked. Turning practice shouldn’t become an exercise in compensating for equipment problems.
Understand what changes beneath your feet
The board can tilt onto an edge, pivot so its nose changes direction and twist along its length. Pressure changes how it engages the surface. These aspects work together rather than forming four separate buttons you press in order.
The AASI performance guide describes these fundamentals as the basis of board control. For a first turn, the useful idea is that coordinated leg and body movements help create a manageable board response. A large shoulder swing isn’t the entire mechanism.
In a skidded turn, the board travels partly sideways relative to where it points. That interaction brushes snow and can help manage speed. A carved turn follows a cleaner edge-led track. Learning a skidded turn is learning a valid form of control, not failing to produce a carve.
The amount of tilt and pressure depends on the exercise and surface. More edge doesn’t automatically create the desired curve, and a board that’s difficult to redirect may need a better-timed release rather than more force.
Explore one short change of direction
Follow the instructor’s chosen starting arrangement. Some early exercises use one-foot gliding before progressing to both feet attached; others begin from controlled edge work. These are different tasks with different support and stopping considerations, so don’t combine instructions casually.
For the selected exercise, begin only when the route is clear and the instructor has explained the finish. Let the glide develop at the intended low speed. Then use the taught movements to guide the board into a rounded path rather than trying to kick it instantly across the hill.
As the board travels farther across the slope, manage the appropriate edge and pressure to arrive at the planned finish. A successful first attempt may feel slow and unremarkable from the outside. That is entirely compatible with it being useful learning.
Pause and describe what happened. Did the curve begin where you expected? Did you remain able to adjust? Was the finish controlled? Those observations help decide whether to repeat the task, simplify it or add the next element.
Give the other edge its own learning time
Heel-side and toe-side turns place the body in different relationships to the snow. One may initially feel more familiar. That preference doesn’t make the other optional if your goal is ordinary connected turns.
Ask the instructor to build a manageable version on the less familiar side. The same route idea may need a different explanation or preparation exercise. Copying the exact sensation from the easier side isn’t always the most useful target.
Toe-side doesn’t mean merely standing on tiptoes, and heel-side doesn’t mean dropping into a deep seat behind the board. Both require coordinated support and movement. Large simplified poses can obscure what the feet and legs actually need to do.
Practice each side as directed without treating the number of attempts as a competition. A few clear repetitions with useful feedback can do more than a large collection of hurried turns you can’t explain afterward.
Use partial exercises when a whole turn feels too large
An instructor may use traverses, partial directional changes or other controlled tasks to isolate a useful movement. You don’t need to regard these as a demotion. They reduce the problem to something small enough to understand.
For example, a task may let the board point slightly more downhill and then guide it back across while staying on a familiar edge. That isn’t a linked turn, but it can develop awareness of direction, release and pressure before a full edge change is introduced.
Don’t improvise those exercises on your own simply because the description sounds mild. The instructor chooses the start, edge relationship, pitch and finish. A movement’s name doesn’t tell you how demanding it will be in a particular place.
If you’re repeatedly accelerating before understanding the task, reduce the demand. More speed may leave less time to coordinate the movement and increase the consequences of a mistake.
Replace common rescue movements with clearer information
Swinging the shoulders can make the board rotate, but it may also leave the body and edge engagement out of step. If every attempt ends with a large upper-body correction, ask the instructor to identify what happens just before it.
Leaning far back can make the board’s front harder to guide. Kicking the rear leg may produce an abrupt skid instead of a rounded path. These aren’t character flaws; they’re movement patterns that need a better task or cue.
Burton’s beginner teaching sequence emphasizes foundational edge and movement work before developed turns. Use that logic when you’re stuck: return to the part you can control and rebuild from there rather than trying to force the finished result.
Work on one clear observation at a time. Perhaps the board begins the curve more gradually, or you finish without hanging over the tail. A useful cue connects to something you can notice, not merely a command to look more relaxed.
Finish the practice with a repeatable outcome
Ask what counts as readiness to progress. It should relate to control in the actual setting: manageable starts, deliberate directional changes and reliable finishes on the appropriate edges. A single turn that happened to work isn’t the same as a skill you can call on consistently.
Stay within the terrain your instructor recommends and stop when fatigue or confusion reduces control. Concerning pain or a suspected injury calls for appropriate help, not another attempt to prove the lesson worked.
The first turn is useful because it introduces choice. You begin to connect a movement you make with a path the board follows. Build that connection carefully, and the next challenge—turning again without starting the whole process over—has something solid to grow from.