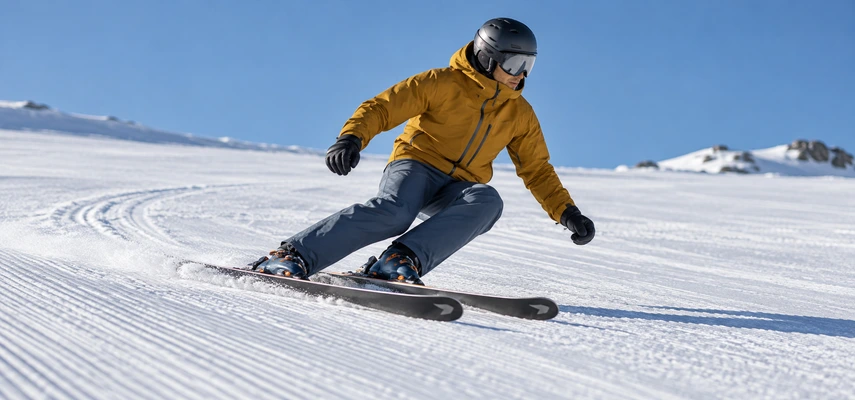

A good carved turn leaves a clue behind: two narrow curved lines instead of a broad brushstroke. The skis have changed direction, yet their tails have followed close to the paths made by their tips. Less sideways scraping, more of the ski’s shape finding a way through the snow.
That can feel remarkably smooth. It can also carry more speed than you intended if you mistake a clean track for a complete speed-control plan. Carving is a useful skill to add to your skiing, not a replacement for every controlled skid you already know.
Here, beginner means new to carving. You should already have reliable parallel turns, stopping and speed management on suitable terrain. Learn the new task with an instructor on a slope selected for your ability and current conditions.
Recognize what you’re trying to produce
In a carved arc, a ski cuts a relatively narrow path with limited sideways displacement. In a skidded arc, the ski also brushes sideways through snow. Real turns can blend those behaviors rather than belong perfectly to one category from start to finish.
Parallel describes how the skis relate to each other; carving describes their interaction with the snow. Two parallel skis can make a very useful skidded turn. The shape of your legs in a photograph doesn’t establish which track you left.
Ask an instructor to identify the difference in a demonstration and, where safe, in the resulting tracks. The objective is recognizable ski behavior, not an impressive lean angle or a predetermined amount of snow spray.
PSIA-AASI Central’s carved-turn description connects tipped, bending skis with round arcs. Its high-performance task isn’t your starting exercise, but it helps clarify the result toward which simpler learning activities build.
Understand how an edged ski can curve
Many alpine skis have curved sides: a narrower waist between a wider tip and tail. That sidecut, the ski’s bending, its edge angle and the support from the snow interact to shape a curved path.
Tip the ski and load it appropriately, and the edge can engage along a bending platform rather than slide freely sideways. Snow pushes back against the ski. The skier manages the relationship through balance, tipping and pressure rather than simply wrenching the tips around.
This isn’t a fixed-radius machine. A printed sidecut radius doesn’t guarantee the radius of every actual turn. Ski flex, loading, edge angle, surface and movement all influence what happens. Nor will adding more of one ingredient improve every situation.
REI’s carving guide introduces sidecut and the phases of the turn. Use that explanation to understand a lesson, while asking the instructor to choose movements suited to your equipment and current ability.
Choose terrain that makes the experiment manageable
Look for appropriately gentle, wide, open terrain with predictable snow, selected with your instructor. A consistent groomed surface can make edge response and tracks easier to interpret than ice, deep fresh snow or heavily broken terrain.
The run needs space for the arcs you can actually produce and an appropriate place to slow or stop. Don’t assume your skis will make a tighter turn just because the available corridor has become narrower.
Avoid choosing a category by color alone. Ratings are relative to the resort, and the day’s traffic and snow matter. The NSAA’s signage guidance makes that local scale explicit.
You aren’t looking for enough steepness to force the skill to appear. If the task needs more speed than you can manage, change the task. An instructor can find a suitable introduction without making acceleration the teaching assistant.
Begin with gentle tipping, not a dramatic body throw
Maintain a comfortable separation between the skis and a stance that leaves the lower joints free to move. Explore small tipping movements as directed rather than suddenly leaning the entire body deep into the turn.
The feet, ankles and legs help change the skis’ angle to the surface. The rest of the body organizes support so that angle is useful. A knee collapsed inward, an unsupported inward lean or a rigid crouch isn’t automatically effective edging.
Your instructor may use shallow arcs or another introductory activity to help you recognize engagement. Follow the selected starting direction and runout. Even a small edge change can alter the path, so the exercise belongs in a clear supervised setting.
Look for a modest response you can feel and repeat. A sudden hook across the slope or a surge beyond comfortable speed isn’t proof that the lesson is working especially well. It is information to reduce the demand and reassess.
Allow the skis to shape the arc without becoming a passenger
As the edges engage, avoid an abrupt pivot that pushes the tails sideways if the task is to explore a cleaner track. Give the ski-snow interaction time to develop within the intended path.
That doesn’t mean standing motionless and accepting wherever the skis take you. You still manage support, tipping and the route. The instructor can help distinguish a responsive body from one that has frozen after finding an edge.
Outside-ski support is commonly important as a firm-snow turn develops. It should emerge through coordinated movement, not a universal stomp on one foot or an instruction to lift the other ski throughout every arc.
Ron LeMaster’s discussion of alignment explains why balancing against skiing’s forces requires more than one fixed pose. For your first carving task, seek enough organization to let the legs adjust while the path remains deliberate.
Finish with a route that still manages speed
A clean carve generally retains motion more effectively than a heavily brushed turn in comparable circumstances. That’s part of the enjoyable sensation, but it creates a planning obligation. The slope hasn’t agreed to stop accelerating you because the tracks look tidy.
Choose arcs and a corridor appropriate to the terrain and available space. A finish farther across the hill changes the direction of travel relative to gravity, but there is no universal promise that any sideways movement will slow you sufficiently.
Keep your existing controlled-skid and stopping skills available. If a carved path isn’t appropriate, deliberately change ski performance rather than clinging to the idea that every turn must remain pure.
Check the gap to other users before starting, and don’t take the full trail width for a practice arc. If the task can’t fit the open space with margin, choose another time or place. Beautiful tracks don’t acquire priority over people.
Release the old edges to begin the next turn
At the end of one arc, the previous edge engagement must change so the skis can enter a new direction. Reducing that engagement appropriately is part of transitioning, not a failure to maintain grip.
The amount and timing of movement depend on the task. Early learning may focus on one arc with a controlled finish before linked carving becomes appropriate. You don’t have to connect everything at once to learn something useful.
Avoid twisting the shoulders around skis that remain firmly engaged. Ask the instructor to observe whether the new turn is difficult because of release, support or an unsuitable starting speed.
When one small arc is understandable, repeat it in the selected environment and explore the other direction. The useful next step comes from what has become repeatable, rather than a fixed number of attempts or an obligation to look symmetrical immediately.
Use tracks as feedback, with their limitations
Tracks can show whether the skis brushed sideways and where that happened. They can’t reveal every cause. A wider mark might involve steering, balance, snow texture or a deliberate speed adjustment.
Only inspect tracks from a suitable visible stopping place without obstructing traffic. Don’t turn uphill or stop abruptly in the active path to examine your artwork. Let the instructor decide how to use that feedback safely.
Describe the sensation too: a ski wandering, an edge catching, support disappearing or speed building. Combining the visible result with your experience gives more information than declaring that the track failed an imaginary purity test.
Keep equipment questions separate from guessing at technique. A qualified shop can assess condition and compatibility. Don’t assume a more expensive or stiffer setup is the missing lesson, and don’t alter safety-critical binding settings yourself.
Compare one clear change at a time. If the instructor adjusts your tipping movement, repeat the same manageable task before changing starting speed, turn size and stance together. Otherwise, a successful track tells you little about which change mattered. A small, interpretable difference is valuable feedback; a complicated attempt that happens to work is harder to learn from. Ask what to preserve in the next repetition and what to leave alone for now.
Build a skill you can choose to use
If the task becomes strained, fast or unpredictable, return to easier skiing and discuss the pattern. Fatigue, discomfort, crowded terrain and changing snow can make the same practice less suitable later in the day.
The NSAA responsibility code still requires control and avoidance of people ahead. A new skill should expand your options while respecting those responsibilities, not narrow them to one track style.
The first satisfying carve may be a short, quiet arc. You tip the skis, stay supported, and feel the curve develop with less sideways scraping than before. Recognize that connection, then learn to repeat it where appropriate. The reward is knowing another way to guide the skis—not having to use it everywhere.