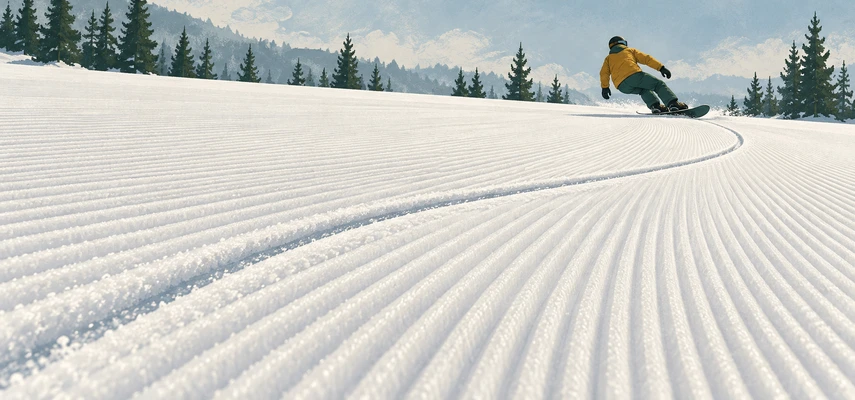

Most snowboard turns leave a broad brushstroke. A carved turn leaves something closer to a pencil line. The difference is small enough to fit beneath your feet, yet large enough to change the whole sensation of riding: less scraping sideways, more following a curve that seems to pull you along.
That feeling can be wonderfully persuasive. It can also tempt riders into going faster than their judgement. Learning to carve means developing a more precise relationship with the edge, not auditioning for the steepest trail you can find.
Begin with an instructor on suitable open terrain, after you can link controlled turns and stop reliably on both edges. Your existing skidded turns remain essential. Carving adds an option; it doesn’t retire your brakes.
What you’re trying to feel
In a carved turn, the board travels predominantly along its engaged edge rather than sliding substantially across it. The tail follows close to the path established by the nose. Look behind from a safe stopping place and you may see a narrow curved track instead of a wide scraped band.
Real snow rarely provides a laboratory demonstration. A little drifting doesn’t make a turn worthless, and a thin track doesn’t prove that everything about your technique is ideal. The useful question is whether you can deliberately guide the board along an arc while remaining balanced and in control.
The AASI technical performance guide treats tilt, pivot, pressure and body position as interacting skills. That framework matters here: carving is a coordinated outcome, not a single instruction to lean harder.
Why tipping the board changes its path
A snowboard’s edge isn’t normally a straight line from nose to tail. The inward curve along its side is called sidecut. Tip the board, load it against supportive snow and the board can bend while the edge engages the surface. The snow pushes back, helping redirect your motion through a turn.
Think of laying a flexible curved ruler against a surface. Its shape helps establish a path, but how it bends and how the surface supports it also matter. Your board’s printed sidecut radius isn’t a promise that every turn will trace a circle of that size.
Snow firmness, speed, edge angle, board construction and pressure all influence the result. There is no universal angle at which carving suddenly switches on. Nor does more angle always mean more useful grip: a large tilt on unsupportive snow can produce an edge that cuts deeper without providing the support you expected.
This is why carving feels cooperative on some groomed runs and elusive on others. The board, the rider and the snow all have a vote.
Choose a place where the experiment makes sense
Ask an instructor to select a gently pitched, wide, groomed area with good visibility, light traffic and consistent snow. You need enough motion for the board to follow an arc, without needing extra speed simply to remain upright. Avoid ice, deep soft snow, crowded intersections and sudden changes in pitch while learning.
An easy-looking ribbon beside a busy trail isn’t a private practice lane. A carving arc may cross more of the trail than the rider behind you expects. Look uphill before starting, yield to people ahead and leave generous space.
The NSAA Responsibility Code makes control and avoiding other people obligations, whatever style of turn you’re making. If you can’t stop within the space you can see, the turn is inappropriate for that situation, however elegant the track looks.
Trail colors alone can’t choose the practice site. Ratings are relative to each resort, and today’s surface may matter more than the sign. Have the instructor assess the actual pitch, runout and traffic.
Start with a short edge-guided arc
An instructor may introduce carving through short traverses or shallow arcs before asking for complete linked turns. The purpose is to isolate the sensation of the edge guiding the board, rather than immediately combining it with everything required for an edge change.
From a manageable starting direction, progressively increase the board’s tilt and allow it to follow a shallow curve. Keep the movement small enough that you can finish in a controlled position and stop. Don’t accelerate down the fall line merely to create a stronger sensation.
Separating a short edge-guided traverse from a full carved turn gives the task a manageable scale. First recognize the feeling, then learn to reproduce it through a larger movement pattern. Your instructor can adjust the starting direction and distance to the actual slope.
Practice each edge in an appropriate location. A successful heel-side arc doesn’t automatically teach your body what to do on the toe side. Treat the two as related experiments with different sensations, rather than insisting they must feel identical.
Let the joints help create the tilt
Your feet and ankles work inside supportive boots; knees and hips contribute to positioning the board and balancing the body. On the toe side, pressing through the front of the boots doesn’t mean standing on tiptoe inside them. On the heel side, lifting the toes doesn’t mean collapsing into an unsupported seat behind the board.
Keep enough flex and mobility to respond to the snow. A rigid pose may work for a moment on perfectly smooth corduroy, then offer no adjustment when the surface changes. Carving needs support, but support and stiffness aren’t the same thing.
Your instructor can distinguish between useful movement at the ankles and knees and simply folding at the waist. From inside your jacket, those can feel surprisingly similar.
Build the arc without throwing the tail
If you’ve learned to turn by rotating the board across its direction of travel, the instinct to push the tail sideways may be strong. That movement can be useful when you want a skidded turn. For this exercise, however, it changes the outcome you’re trying to explore.
Allow the edge to establish a path instead of rushing to swivel the board into its finishing direction. Build support progressively, maintain a functional position along the board and let the curve develop. A sudden stamp or abrupt twist often produces a scrape rather than a clean arc.
This doesn’t mean freezing your shoulders or forbidding rotation. Your body still organizes itself through the turn. The goal is to avoid an unnecessary movement that overwhelms the board’s edge-guided path, not to impersonate a garden statue.
Look toward the useful space ahead. Watching the nose constantly provides an excellent view of your equipment and a poor view of everyone sharing the trail.
Connect the turns when the separate pieces work
Linked carved turns require releasing one edge, moving through the transition and establishing the other without a rushed sideways shove. There are different ways to manage flexion, extension and pressure during that change. A qualified instructor can choose a progression that matches your current riding.
Keep the first linked attempts modest. The objective isn’t a string of identical arcs stretching to the bottom. It may be two controlled edge-guided turns, followed by an intentional skidded turn and a stop in an appropriate visible place.
Notice whether speed remains manageable as the board crosses the fall line, the direction most directly downhill. A board following its edge can retain considerable speed. If your turns become increasingly direct downhill, adding more edge angle doesn’t automatically solve the route problem.
Finish the arcs enough to manage your line, within the available space, and return to familiar speed-control movements when necessary. If controlling the sequence requires an emergency correction every other turn, reduce the task or change the terrain with your instructor.
Use the snow as feedback
A narrow track, reduced scraping and less sideways spray can suggest that the board is following its edge. REI’s carving guide highlights these practical observations. Treat them as clues rather than a scoring system: snow texture affects both sound and the marks left behind.
Ask a companion or instructor to observe from a safe location. Does the tail follow the nose, or swing outward? Does one edge produce a consistent arc while the other abruptly breaks away? Does the change happen at the same point in successive turns?
Those observations are more useful than deciding you’re simply bad at carving. A recurring pattern gives the instructor something specific to investigate: timing, pressure, tilt, terrain or equipment.
Video can help when recorded without distracting the rider or obstructing traffic. Compare similar turns on similar snow. A clip of an expert on a different board and surface isn’t a fair diagnostic tool for your next attempt.
Check equipment before blaming yourself
Comfortable, secure boots and correctly installed compatible bindings help movements reach the board. Poor fit can allow movement inside the boot before the board responds. Damaged or poorly maintained edges can complicate grip. Have a qualified shop inspect concerns rather than compensating with increasingly forceful movements.
Boot overhang also matters as edge angles increase. A shop can assess board width and binding placement for your equipment; a generic shoe-size cutoff isn’t enough to settle every setup. Don’t move bindings randomly or modify a rental board’s edges in pursuit of a cleaner track.
A specialized carving board isn’t a prerequisite for exploring the skill. Start with suitable equipment in good condition and instruction that works with it. Buying a more demanding setup can change the problem without solving the original one.
Know when to stop chasing the line
Fresh corduroy, enough space and a cooperative board can make one good turn feel like a discovery. Enjoy it. Then remember that the useful skill is choosing the turn the situation calls for.
Traffic may require a shorter route. Changing snow may require more slipping. Fatigue may make the next attempt less precise. Returning to a controlled skidded turn is evidence of judgement, not a failed examination.
The pencil line is rewarding because it records a moment when your movements, the board and the snow worked together. Learn to recognize that cooperation, develop it with instruction, and keep the ability to choose another kind of turn whenever the mountain asks.