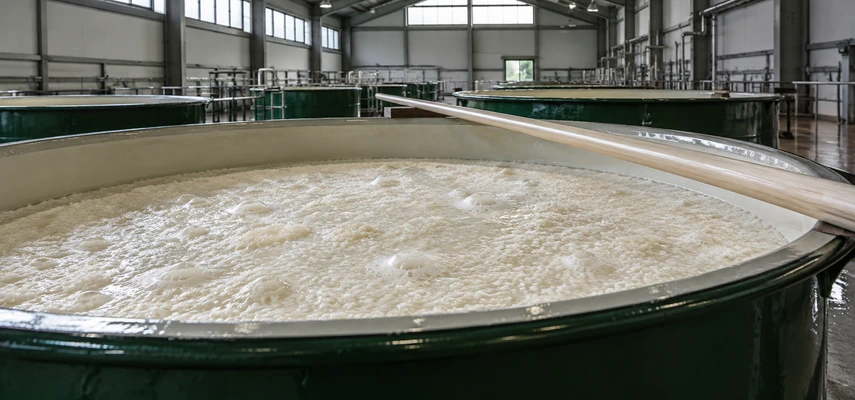

The sugar supply is being made while the yeast is spending it. That is the essential idea behind multiple parallel fermentation, the process at the center of sake brewing. Instead of turning all the rice starch into sugar first and then starting alcoholic fermentation, the brewery manages both transformations together in the main mash.
This arrangement helps explain how sake can reach a high alcohol level through fermentation alone. It also explains why the brewer cannot focus on yeast while ignoring rice preparation and kōji. The tank contains a connected system: one activity feeds another, and the relationship must remain useful as the mash develops.
Multiple parallel fermentation contains two different jobs
Saccharification releases sugars from starch through enzyme action. In sake, kōji supplies the enzymes involved. Alcoholic fermentation uses yeast to convert fermentable sugars into alcohol and carbon dioxide. The word parallel means these activities overlap; multiple recognizes that more than one transformation is involved.
Neither process is distillation. The brewery does not boil the mash to concentrate alcohol while fermentation proceeds. Nor does yeast directly turn intact starch into alcohol without the sugar-producing step. Those two mistaken explanations would erase the actual reason kōji is essential.
The official Level 2 specification asks you to understand parallel fermentation, balance and spoilage prevention alongside main-mash ingredients, additions, time, temperature and ending fermentation. These requirements describe one developing production problem rather than separate pieces of trivia.
A supply-and-use comparison makes balance visible
Imagine a workshop where one team prepares parts and another assembles them. If preparation runs far ahead, unfinished parts accumulate. If assembly runs ahead, workers wait for materials. The sake mash isn’t a factory floor, but sugar supply and yeast use also need to fit each other over time.
Kōji enzymes continue acting on rice as yeast consumes available glucose. The brewery does not need to hold all of the mash’s potential sugar in solution at once. That can help avoid exposing yeast to an excessively concentrated sugar environment at the outset. The aim is a manageable progression, not an empty tank with no sugar at any moment.
Balance does not mean the two rates are mathematically identical every second. Conditions and available material change. It means that the course of sugar release and fermentation supports the planned development of the mash. A useful explanation must allow for that changing system rather than promise a perfectly flat sugar reading.
Moromi is the main mash, not a separate organism
Moromi is the main fermentation mash. It includes the established starter, steamed rice, kōji and water, with the starter supplying an effective yeast population. Rice grains, dissolved material and active biological processes coexist. A photograph of a cloudy mash should not be mistaken for a bottle-ready cloudy specialty sake.
The starter has already prepared the microbial starting point. The brewery now has to enlarge the working volume without making the conditions unsuitable for that population. Pouring everything in at once would change concentrations and the population-to-volume relationship abruptly. The conventional addition plan approaches expansion more gradually.
This is where the starter lesson connects with the present one. Acidification and yeast development were not isolated rituals before the real work. They prepared the population and environment that make controlled expansion possible. The main mash inherits that preparation and then asks much more of it.
Three additions normally unfold over four days
The conventional three-addition method is called sandan-jikomi. More steamed rice, kōji and water are added in three stages, normally across four days. There is a rest day after the first addition before the second and third additions. Three stages therefore does not mean three consecutive days of identical work.
Common names are hatsuzoe for the first addition, odori for the intervening rest, nakazoe for the second addition and tomezoe for the third. Wording varies between producer accounts, but the useful concept is unchanged: initial expansion, a pause, then further expansion. Don’t confuse the rest with a fourth ingredient addition.
Masumi’s account of increasing the mash gives a producer’s explanation of the sequence. Nishi Shuzo’s Tenbu production account likewise describes additions across four days followed by continuing fermentation. These are concrete examples of managing scale rather than simply filling a tank.
The purpose is to support the developing yeast population and a suitable environment as the volume grows. Fresh additions change temperature, concentrations and the amount of material available for enzyme action. The brewer manages those changes so that fermentation stays on the intended course.
A rest day is an active production decision
The word rest can make odori sound as if nothing happens. The organisms do not consult the production calendar. Yeast and enzymes remain active while the brewery postpones the next volume increase. The pause gives the system time to develop before another demand is placed on it.
This is useful beyond memorizing Japanese vocabulary. A delay can be part of control, just as an addition can be part of control. The brewer manages the rate at which the environment changes. That principle also appears in temperature adjustment and the eventual decision to finish the fermentation.
For an examination question, focus on the reason for gradual addition rather than a claim that the method sterilizes the mash. It supports a favorable population and environment, helping control spoilage risk. It does not eliminate the need for sanitation, monitoring or appropriate raw materials.
Temperature changes the pace and the style possibilities
Temperature affects enzyme activity and yeast performance. Cooler fermentation generally proceeds more slowly and is commonly used in delicate aromatic production plans. Warmer management can move activity along differently. Neither direction is automatically better; the brewery chooses conditions for the intended sake and the organisms being used.
The important detail is that both sides of the partnership respond. Adjusting temperature isn’t simply turning yeast up or down while sugar release remains fixed. Kōji enzyme behavior, rice digestion and yeast metabolism interact. A plan has to keep that relationship workable rather than optimize one part in isolation.
Fermentation also generates heat, so controlling mash temperature can require removing heat rather than merely warming a cold room. The tank has its own developing conditions. Looking at the weather outside the brewery would be a poor substitute for monitoring what is happening inside the mash.
Time follows the production plan
Main fermentation commonly lasts several weeks, with roughly three to four weeks a useful introductory scale and longer or shorter courses depending on style and method. The NRIB starter and fermentation overview explains how the staged mash then develops toward a high alcohol content.
Duration is not an independent guarantee of quality. A longer fermentation may reflect cooler management or another deliberate plan. It may also reflect a problem in a different situation. The meaningful question is whether the progression matches the brewery’s aim, rather than whether the calendar displays an impressive number of days.
Likewise, a fermentation doesn’t end just because a generic schedule says it should. The brewer considers development, measurements and sensory aims. A textbook time range helps you picture the process; it isn’t a production command that overrides the condition of the actual mash.
High alcohol does not require distillation
Sake fermentation can produce alcohol levels around 17–20% abv before later adjustments, with variation according to method and intended result. Multiple parallel fermentation supports that achievement by making sugars available over time while a suitable yeast population works through them. The alcohol is produced biologically rather than concentrated by a still.
Don’t infer the pre-dilution level from a lower number on the finished bottle. Many sakes are later diluted with water to reach a chosen strength and balance. Conversely, not every undiluted sake must have the same high alcohol figure. Production can be designed for different endpoints.
Optional brewing-alcohol addition is another separate decision. It must not be used as the explanation for all of sake’s alcohol. Junmai production has no such addition, yet yeast still creates substantial alcohol through fermentation. Article #9 examines additions; Article #10 handles dilution.
Ending fermentation moves the mash toward separation
The brewery decides when the mash has reached the intended stage, then moves toward separation of liquid and solids, commonly called pressing or filtration. Removing much of the rice material and yeast changes the system that has been working in the tank. Cooling and subsequent handling can also help manage continuing activity.
Pressing is not identical to pasteurisation, and clarification is not a guarantee that all viable organisms or active enzymes have disappeared. Later stability measures have their own functions. Understanding these boundaries prevents the common error of treating the end of the main fermentation as one operation that simultaneously finishes every aspect of the sake.
One-page revision summary
Kōji enzymes release sugars while yeast ferments them: that overlap is multiple parallel fermentation. Manage supply and use together. Moromi expands through three conventional additions across four days, with an intervening rest. Temperature, time and the established starter support successful fermentation and help control spoilage risk. The mash can reach high alcohol without distillation; pressing, optional additions and dilution are separate decisions that follow.
Knowledge check: 10 original practice questions
Independent TFE questions, not official WSET examination items. Choose one answer per question; explanations follow separately.
1. Which two transformations overlap in multiple parallel fermentation?
- Polishing and harvesting
- Saccharification and alcoholic fermentation
- Distillation and bottling
- Dilution and labeling
2. What is moromi?
- The rice variety
- The final label
- The main fermentation mash
- A serving cup
3. Why add ingredients in stages?
- To support the yeast population and environment as volume grows
- To ensure no fermentation can occur
- To distil each portion
- To eliminate every microbe
4. How long does the conventional three-addition sequence span?
- One hour
- Three months
- Exactly three consecutive days
- Four days including a rest
5. What happens during the rest day?
- All biology stops
- Enzymes and yeast continue working before further expansion
- All alcohol is removed
- The mash is bottled
6. Why is temperature control a system-wide decision?
- It affects only the glass color
- It has no effect on yeast
- Both enzyme processes and yeast activity respond
- It replaces kōji
7. How can sake reach high alcohol without a still?
- Suitable yeast ferments sugars supplied during parallel processing
- Rice polishing creates alcohol
- Water contains ready-made ethanol
- Charcoal concentrates sugar into alcohol
8. Does every finished sake retain its fermentation strength?
- Yes, dilution is forbidden
- Yes, all bottles are 20%
- Only sparkling sake can be diluted
- No, later water dilution can adjust strength
9. What is a useful approximate main-fermentation timescale?
- A few seconds
- Several weeks, depending on the production plan
- Always one year
- Exactly the four addition days only
10. Is pressing the same as pasteurisation?
- Yes, both mean distillation
- Yes, both always sterilize
- No, separation and heat treatment serve different functions
- Only if the sake is junmai
Answers and explanations
1. B — Saccharification and alcoholic fermentation. Kōji enzymes release sugars while yeast converts available sugars into alcohol and carbon dioxide. Mapping: LO1.
2. C — The main fermentation mash. Moromi names the mash in which the main production fermentation occurs, not a separate organism. Mapping: LO1.
3. A — To support the yeast population and environment as volume grows. Gradual expansion helps keep population and conditions favorable without claiming sterility. Mapping: LO1.
4. D — Four days including a rest. A rest follows the first addition, so the three additions normally extend across four days. Mapping: LO1.
5. B — Enzymes and yeast continue working before further expansion. The pause concerns adding material, not a complete pause in microbial or enzyme activity. Mapping: LO1.
6. C — Both enzyme processes and yeast activity respond. Temperature changes interacting activities, so the brewer must consider their relationship. Mapping: LO1.
7. A — Suitable yeast ferments sugars supplied during parallel processing. Biological fermentation, supported by ongoing sugar release and management, creates the alcohol. Mapping: LO1.
8. D — No, later water dilution can adjust strength. Finished strength can differ from mash strength because dilution is a separate production option. Mapping: LO1.
9. B — Several weeks, depending on the production plan. The addition sequence establishes the mash, after which fermentation continues for weeks. Mapping: LO1.
10. C — No, separation and heat treatment serve different functions. Physical separation does not necessarily remove all viable organisms or inactivate enzymes. Mapping: LO1.
Continue studying sake
Article #4: Kōji Production Explained: Enzymes, Mould Cultivation, and Brewing Science · Article #6: Sake Yeast and Water Explained: Strains, Minerals, and Aroma · Article #7: Sake Fermentation Starters Explained: Sokujō, Kimoto, and Yamahai · Article #9: Sake Filtration and Alcohol Addition Explained: Pressing, Clarity, and Style